jsup-blog 실험: 구글 블로그(Blogger) 연동을 위한 액세스 토큰 생성
- Get link
- X
- Other Apps
by joviansummer
original STEEMIT post: https://steemit.com/blog/@joviansummer/jsup-blog-blogger
구글 블로그 API를 사용하려면 "OAuth 2.0"이라는 인증 방식을 통해서 액세스 토큰을 받아야 합니다. 우선 "OAuth client ID"라는 것을 발급 받고 credentials.json 파일을 만듭니다. 구글 블로그에 가입해서 블로그를 생성한 후에 진행합니다.
절차는 아래와 같습니다.
일단 구글 계정으로 로그인을 한 후, 구글 개발자 페이지의 블로그 관련 내용으로 갑니다. 아래의 링크입니다.
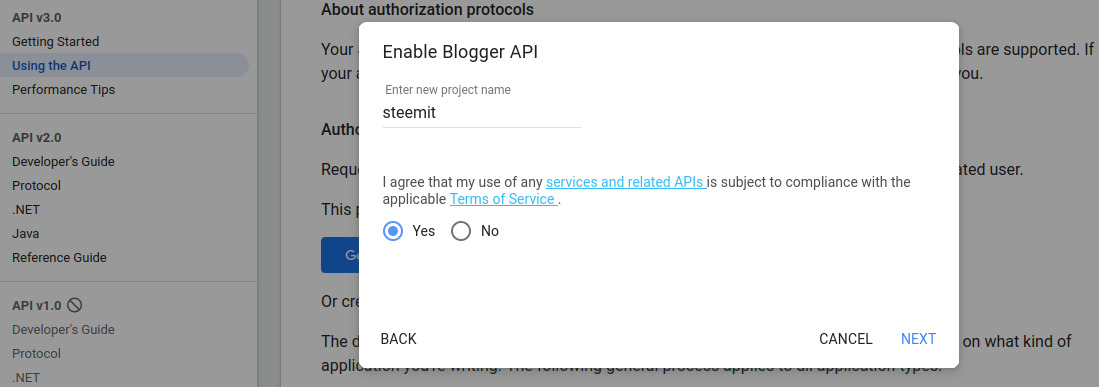
이 페이지를 보면 "Get an OAuth client ID"라고 써 있는 파란 버튼이 있습니다. 이 버튼을 클릭한 후 "Select or create project"에서 "Create a new project"를 선택해서 새로운 프로젝트를 생성합니다.

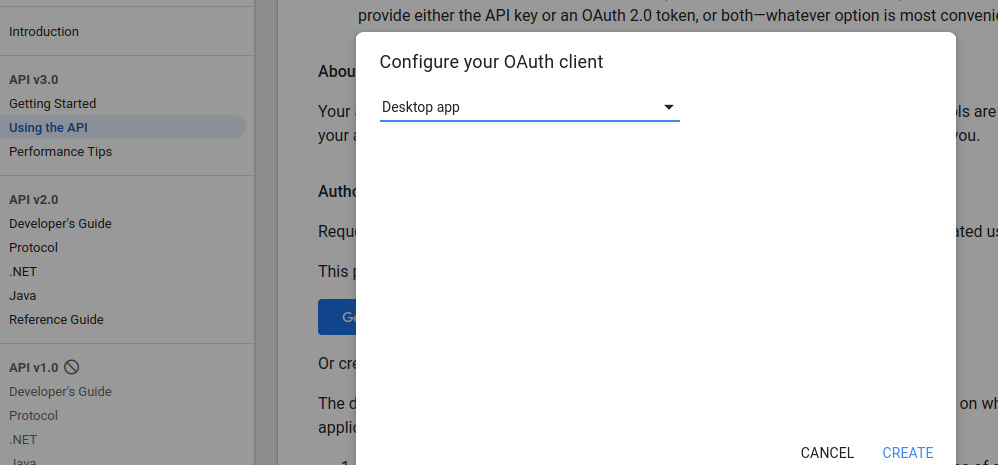
프로젝트 이름(project name)을 지정하고 제품명(product name)을 지정합니다. 종류는 "Desktop App"으로 선택하고 "CREATE" 버튼을 클릭합니다.


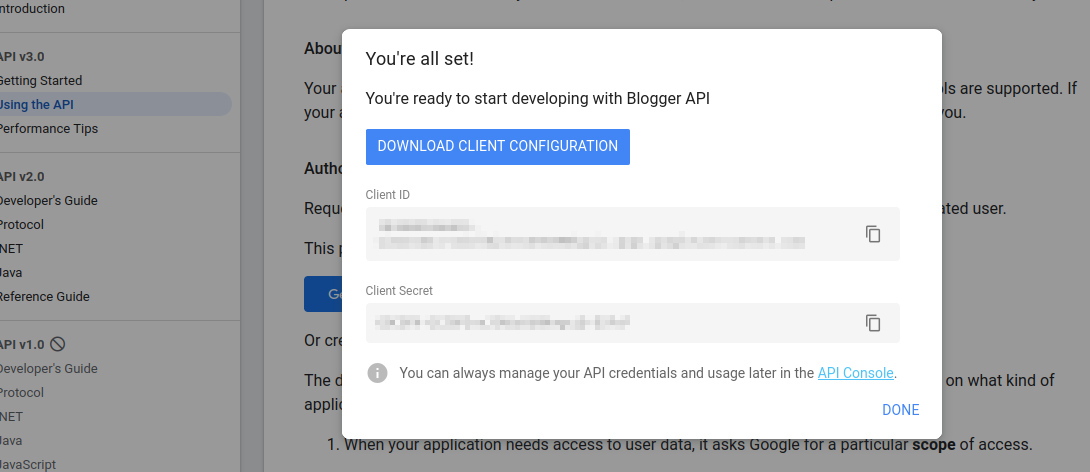
API 설정이 완료되면 "DOWNLOAD CLIENT CONFIGURATION" 버튼을 클릭해서 "credentials.json" 파일을 다운로드합니다.

이제 @jsup 서비스에 등록하기 위한 토큰 파일을 만드는 절차가 필요합니다. 파이썬이 설치되어 있어야 합니다. 리눅스는 파이썬이 기본으로 설치되어 있고, 윈도우의 파이썬 설치는 아래의 링크를 참고하시기 바랍니다.
절차는 아래와 같습니다.
우선 구글 API를 사용할 수 있는 파이썬 라이브러리를 설치해야 합니다. 터미널창(윈도우의 경우 명령 프롬프트)에서 아래와 같이 입력합니다. 2개의 모듈을 설치해야 하므로 pip3 명령도 2번 실행해야 합니다.
pip3 install google-api-python-client
pip3 install google-auth-oauthlib
설치가 완료되면, 앞에서 다운로드한 credentials.json 파일이 있는 디렉토리에 파이썬 스크립트 파일을 하나 만듭니다. 파일명은 get_token.py라고 하겠습니다. 아래의 코드를 복사해서 붙여 넣고 저장합니다.
import pickle
from pathlib import Path
from google.auth.transport.requests import Request
from google_auth_oauthlib.flow import InstalledAppFlow

SCOPES = ['https://www.googleapis.com/auth/blogger']
client_sec = 'credentials.json'

if Path(client_sec).exists():
    print("found:", client_sec)
else:
    print("ERROR:", client_sec, "NOT FOUND!")
    exit()

creds = None
if Path("auto_token.pickle").exists():
    with open('auto_token.pickle', 'rb') as token:
        creds = pickle.load(token)
if not creds or not creds.valid:
    if creds and creds.expired and creds.refresh_token:
        print("trying to refresh token")
        creds.refresh(Request())
    else:
        flow = InstalledAppFlow.from_client_secrets_file(client_sec, SCOPES)
        creds = flow.run_local_server(port=0)
    print("saving auto_token.pickle")
    with open('auto_token.pickle', 'wb') as t:
        pickle.dump(creds, t)
else:
    print("OK: valid pickle file")
credentials.json 파일로부터 auto_token.pickle 파일을 생성하는 코드입니다. 스크립트를 실행합니다.
python3 get_token.py
웹브라우저가 실행되면서 구글 블로그에 대한 접근을 허용할 것이냐고 묻는 페이지가 나올 것입니다. 구글 계정에 로그인하지 않았으면 로그인을 먼저 해야 합니다.
접근을 허가하면 auto_token.pickle 파일이 생성됩니다. @jsup 서비스에 이 파일을 등록하면 해당 구글 블로그에 접근할 수 있습니다. 등록은 이메일로 파일을 받아서 제가 직접 서버에 등록하는 방식을 생각하고 있습니다.
@joviansummer의 스팀 프로젝트
스팀 증인노드를 운영중입니다. @jswit에 증인투표해 주시면 감사하겠습니다.
(https://steemitwallet.com/~witnesses)
Comments
Post a Comment